 Back
Back  ---> Concept
  Back
Back  ---> Concept
 After initialization Wildfire opens it's Main-Window on a screen of your choice. This is the default public screen for the startup.

You can change this inside the MUI preferences. Just select the MUI settings from inside menu. There you can define a own public screen with your personal screen depth. We recommend 24 bit if this is possible on your configuration. 32 colors works o.k if you have no GFX-Card, but 24 bit is recommended because it`s faster for your previews. (Wildfire calculates all the effects in 24 Bit and so it has nothing to render down when displaying the preview)
From the main window you can select three pages and choose some other
parts from Wildfire`s menu.
The 3 Pages
The Window titel
Inside the window title some informations are displayed. Between the
brackets the current so-called session you are working on is shown.
Example:
Online Help
All buttons and all sub-windows of Wildfire have their own online-help
(mui-bubbles) where you can get informations about their functions.
Inside the MUI settings you can select the time you have to stop
the mouse pointer until the bubbles will be displayed.
If you want to know what a effect or a window is used for then make sure
that the window you want to get informations about is selected and your
mouse pointer is situated in front of his window (not over a gadget).
After some seconds a helpt text is displayed and tells you what you can
do inside this window.
If your mousepointer is located over a gadget then the help text from
this gadget is displayed.
Window size
Inside the right corner of all the different windows there are three
gadgets, the left one is used to iconify the window or save the current
window dimensions or start the MUI preferences progam. The other two
gadgets are standard Amiga gadgets. If you want to fix the size
of your current window then select the third gadget and choose Snapshot.
The Menu
From inside the menu (just press the right mousebutton) you can reach some
other functions and program parts.
 How to change the MUI settings (Example: select an own screen)
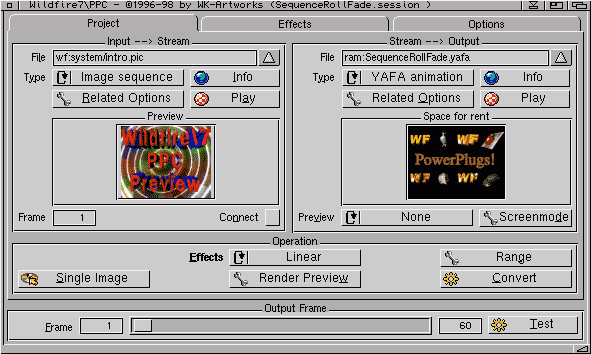
Here you can set up your project (Session) including input, output, the kind of
effects and the preview type you want to use. Furtheron you can
specify special ranges of the so called session that should be
processed.
And here you start the whole thing, using the `Single image` or the
`Convert` button you generate one single image or a complete image
sequence/animation.
On this page you select the effects which will be inserted between the
input and the output of the project. It is possible to turn off the
effects, too. So the images will be passed directly from the input to the
output. (e.g. if you want to simply convert one anim into another format)
Depending on the kind of Effects selected on the Project page (No / Linear / Non Linear)
this effect page changes it`s outlook.
The options for the current project (Session) may be set on this page. Do not mix it
up with the preferences of Wildfire. The preferences contain settings for
the whole program, this options are just for the current so-called session
you are working on.
Wildfire7\PPC - ©1996-98 by WK-Artworks (SequenceRollFade.session )
This means that I currently work on the SequenceRollFade.session.
Afterwards select your input, choose the output and the
type of effects and give the new Session a name using
the Save As function of the menu.
Then you are ready for playing with the effects.
This session drawer has the same structure like the
Animations drawer on the CD. So have a look at the Anims
and if you find something useful then simply load the
corresponding session and have a look how it is done.
If you have set Expertmode=off inside the preferences
and if you select a session which was already there
then Wildfire will ask you if you really want to
delete the old file.
If you search for the settings for the current
project like color depth and so on the go to
the option page inside Wildfire`s window and not
to the preferences window.
 Back
Back  ---> Concept
 ©1998 WK-Artworks